One of the problems with just using 1-finger power chords is that for some songs you have to move a long way up and down the neck so choosing your chord shapes carefully will help you to change between them more easily.
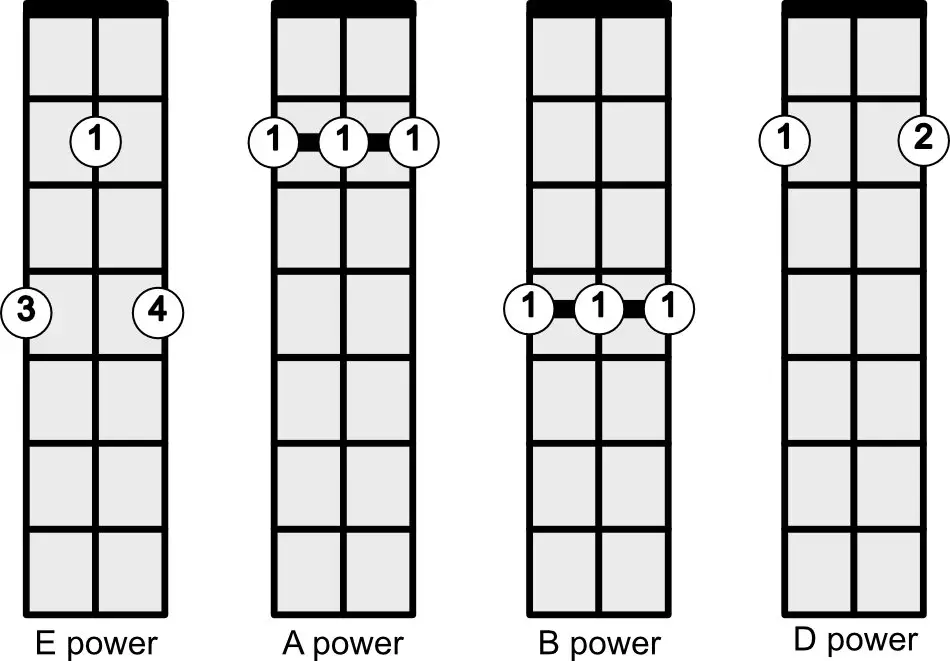
Playing in the key of E on a Cigar Box Guitar tuned to open G can cause some problems for beginners. I’ll show you how choosing different chord shapes to use in a particular song can really help. We will look at how to play the chords of E A D and B just within the first 4 frets of the guitar:

Playing A Song In E In Open G Tuning
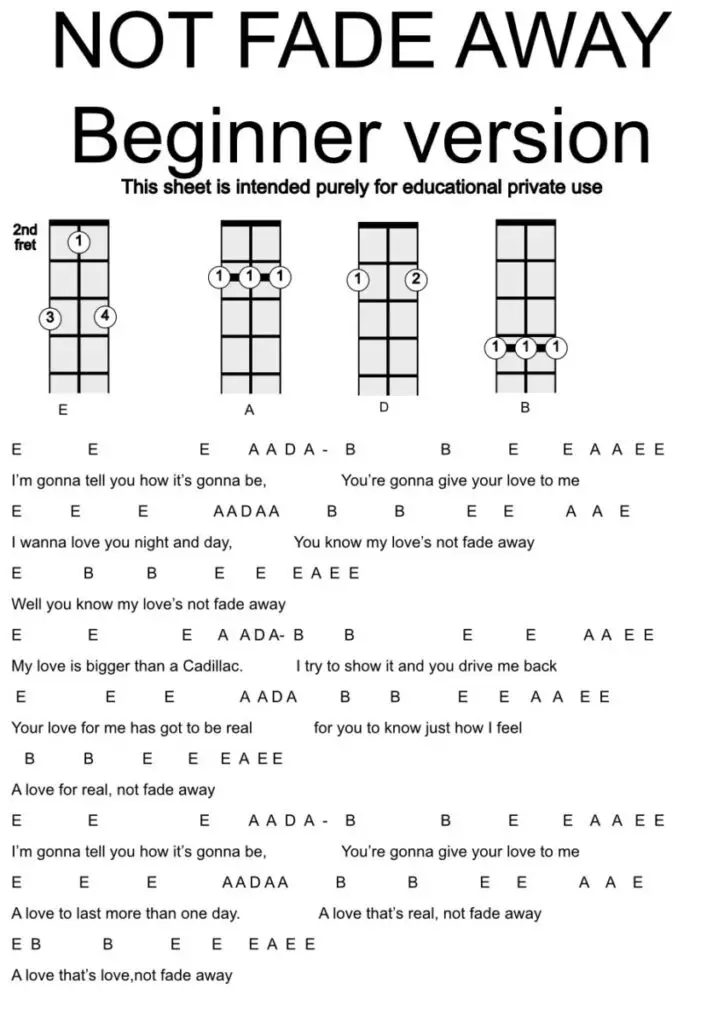
We are going to look at how to play “Not Fade Away” on a 3-String Cigar Box Guitar. This rock ‘n’ roll song was made famous by Buddy Holly and I have arranged it for 3 string guitar using the power chords for E, A, B and D in such a a way that shows the value of learning different shaped power chords, rather than just using the 1-finger barre chords.

You can download the full page PDF here:
There is a YouTube video of me teaching this at the bottom of this post.
The Problem With Using Just 1-Finger Power Chords
For some keys you will need to move up and down the neck a lot if you use 1-finger power chords.
For instance to play in the key of E in G D G tuning : If we just use 1-finger power chords, we will need to move from the 9th fret for E to the 2nd fret for A ( the IV or 4 chord) to the 4th fret for B ( the V or 5 chord) This song also needs the D chord on the 7th fret. As you can see that’s a lot of movement up an down the neck.
Instead we will use the E and D power chords played with the root on the 2nd string as shown above. This is such a useful shape for many songs. The E chord is the same as the D chord but moved up 2 frets – we have to put our 1st finger on the middle string to mimic the effect of the nut.
Alternative Fingering For E Power Chord For An Easy Toggle Between E and B
I have found a way to play E that makes it easy to play E and B even faster. I use my fingers lined up on the strings for B with my forefinger behind like this:

That may seem like extra hassle but by just lifting off that 3rd finger on the middle string I get the E power chord:

Now I don’t always use that shape for the B chord, but if I have a very quick change between E and B or B and E it can really help. It’s a chord change that happens fairly often in the key of E because B is the V or 5 chord of E.
Moving Quickly Between A And D
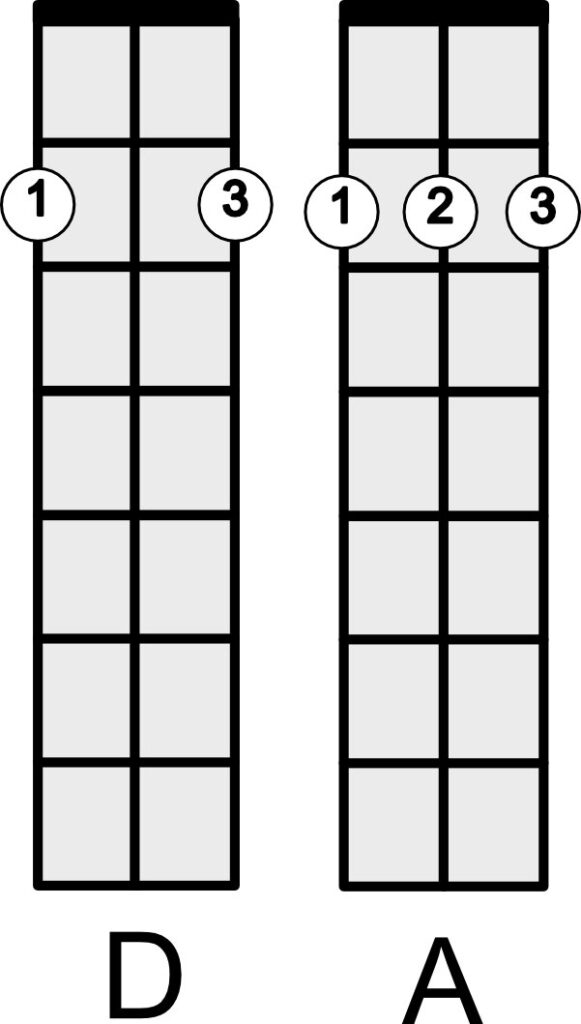
Just as the chord shapes I’ve shown for E and B help with quick chord changes, these chord shapes help for quick changes between D and A or A and D:

Lining up the fingers for A and then lifting the finger on the middle string quickly converts the chord to a D.
Beginner Tips For Learning From A Song Chord Chart
- learn the shapes
- find them on the guitar
- practice getting a clean sound
- try moving from one chord to the next
- practice slowly and steadily
- work out the strumming pattern
- play the song through slowly to start with
Beginning To Play The Chords For A Song: Helpful Hints
When you look at the chords required for the song, the first thing to do is learn the shapes. This means looking at the shape and then finding it on your guitar. If you haven’t done so already, you can download the PDF for “Not Fade Away” here:
Try each chord in turn. It’s quite usual for chords to sound a bit muffled at the beginning- this is because one or more of the strings is being slightly muted by either another finger or incorrect finger placement. To correct this:
Check that your fingers are fairly upright and that you are using your fingertips to fret the note. Check that your fingertip is just behind the fret wire and pushing down with just enough force to play a clean note. Pressing too hard will tire out your fingers so be careful not to do that.
If you can’t use the fingers shown because it’s too much of a stretch, try different fingers, a different shape or just keep practicing the stretch.
When you can play the shapes cleanly, try moving from 1 chord to the next. This is tricky at first, both for your brain and your fingers so go slowly at the beginning. Just strum down a few times on each chord- you can add the strumming pattern later. When you’re confident that you can move from 1 chord to the next without getting completely confused, try adding a strumming pattern- you can use a simple one at first. You can’t learn everything all at once.
Gradually speed up and add any extra flourishes in the way of a strumming pattern. As long as you keep things steady you will be playing the song as a recognizable tune in a little while.
It might take a few days or even a couple of weeks to get there but remember that everyone who can play amazingly now all went through the difficulties that every beginner faces.
Video
I have a video lesson of this song on You Tube:
