This is something you will need to do on any build you make. You will also need to change strings on your cigar box guitar.
- Remove the old string.
- Thread the new string from the bridge end to the machine head and through the hole.
- Turn the peg anticlockwise, with the string travelling further down the post.
- Only cut away the excess string when you are sure you have sufficiently securely wound it around the post.
What Will You Need To Replace Your Guitar Strings?
- Strings
- Pliers and /or wire cutters
- String winder (optional but useful)
Choosing Strings For Your Cigar Box Guitar
There is more detail in this post about string choice, but here is a brief overview. I have put a list on the resource page of strings that I have used but my current favorites are these from Chickenbone John ( I live in the UK) .
Either buy a pack of strings suitable for a six string guitar and use the 3rd, 4th and 5th strings or buy a three string set designed for cigar box gs.
Opening The Pack Of Guitar Strings
When you open the pack of strings you will find either:
- one clump of strings or
- separately packaged strings
Either way, carefully unhook the end of the strings and let them unwind, keeping your face clear.
if the pack contained all the strings wound together, you will need to work out which string is which. Sometimes the strings have a coloured end which denotes their thickness. The packet will have a guide.
If the strings are muddled together and have no colour coding, you will need to look at the thickness of the wire.
The thickest string, or heaviest gauge, will be the lowest string of your guitar. This actually sits at the top of the box, facing up as you play. With your guitar lying down, with the neck facing up and away from you, the lowest string is to the left.
Machine Heads Are Also Called Tuning Pegs

Machine heads on a cigar box guitar will either be for acoustic or electric guitars. They can have an open back or closed back. When you turn a tuner peg anticlockwise, the tuning post turns anticlockwise.
Typically, machine heads on the left hand side of the headstock turn anticlockwise to stretch the string and make the pitch higher.
Conversely, machine heads on the right hand side of the headstock turn clockwise to raise the pitch.
It is usual for the strings to run up the neck to the inside of the machine head and outwards. But remember that there are no hard and fast rules when it comes to cigar box guitars.
Sometimes builders use eyelet screws to guide the strings towards the machine heads.
Positioning Of The Machine Heads
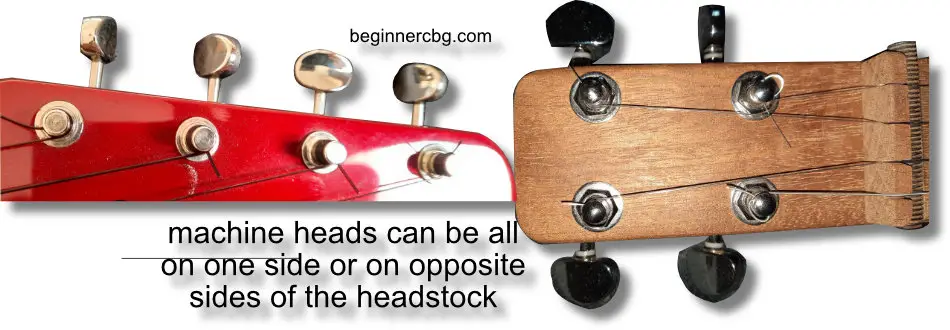
With an even number of strings the machine heads will either be all on the left (typical electric guitar)or half on the left and half on the right (typical acoustic guitar)
With a three-stringed instrument you have more choice:
- all on the left (or on the right for a left-handed player)
- two on the left and one on the right
- one on the left and two on the right
Whilst you can buy specific sets of machine heads from a cigar box guitar specialist, you can buy standard six string sets.
Rather than waste the spare machine heads, you can put machine heads from a standard set of guitar tuners onto two cbgs. That would be one guitar with two machine heads on the left and one on the right. The second build would have one tuner machine head on the left and two on the right.
If you have bought your guitar, check which set-up you have. I suggest you take a quick photo with your phone of how the strings are positioned because it is easy to forget when you start removing strings.
Starting To Remove Old Strings
Do not be tempted to just cut the strings! Not only could this damage the instrument, but flying wire can really hurt.
Instead, loosen the strings. Use a string winder if you have one:
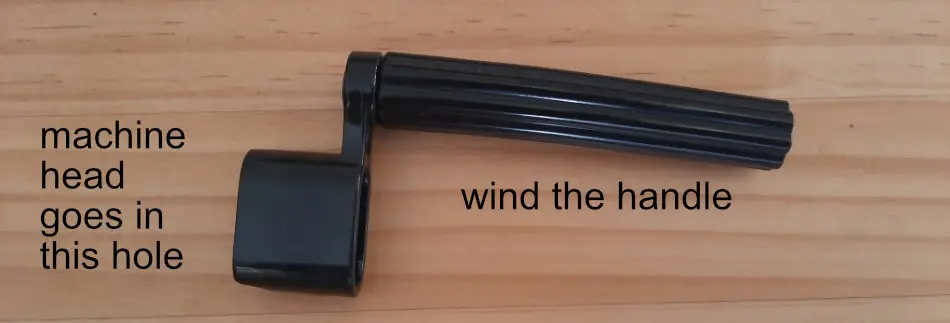
They are not that expensive and will save you time and wrist strain. Some people like to attach them to a drill for speed, but I prefer the control of winding by hand.
Remove One String At A Time Or All At Once?
Some people prefer to work on one string at a time and some prefer to remove all strings at once. This is because the sudden change in force on the neck as the strings are released may damage the neck. Personally, I like to loosen all the strings and then replace one at a time. However if you are a beginner, replacing one string at a time whilst keeping the other strings in tune is a good idea.
One of the hardest things about tuning new strings as a beginner is to get the correct octave. This is why I recommend replacing one string at a time. You can then use the old string to help you make sure that the new string is not tuned to the wrong octave. A guitar tuner will help you to get the correct pitch but it’s not clear (at least it isn’t from my Snark tuner ) how to get tuned to the correct octave. Bear in mind that if you try and tune the strings much too high they are going to break.
If you are replacing the strings because one broke, I would replace that one first. Unless it was a very new string that broke, I would replace the others too as they will be worn.
Removing The Old Guitar Strings
I like to just keep unwinding until I can pull the string out. But some people like to cut the strings:
Once the strings are fairly loose and unplayable, you can carefully snip them, preferably near to the twelfth fret. This makes it easy to remove the lower half by pushing it towards the bridge. If you choose to replace the strings one at a time, you will need to be careful that you don’t accidentally snip a replaced wire.
Put the old strings somewhere safe where you will not trip over them and then dispose of them.
Installing New Guitar Strings
- Start with the thickest string. Thread from the bottom up.
You will need to insert the string through the eyelet hole on the through neck or tail piece. Steel strings usually have a small metal ring or ball on the end to prevent the string slipping through. However if you are using nylon strings you will need to tie a knot. Make sure the string is pulled through the bottom hole so that the ball on the bottom of the string is touching the tailpiece. Don’t leave any string dangling at the back of the guitar.
- Pull the string up, over the bridge, neck and nut all the way up to the tuning peg and through the hole.
As you push the string through the hole on the tuning peg, make sure it is wrapping around the correct side of the tuning post. For pegs on the left hand side, the string needs to enter from the right. This will ensure that when you turn a peg anticlockwise you will be tightening the string and raising the pitch.
- As you pull the string through the hole in the tuning peg, hold it down towards the nut but leave a bit of slack.
You want to allow enough string to wrap around the post a couple of times. ( Some player like to push the string through the hole , then half-way round the peg and back through the hole again. Personally I don’t do this, but feel free to experiment with a way of attaching the string to the post of the tuning peg to find a method that works for you.)
- Bend the string up out of the way at the point where it emerges from the hole but don’t cut it yet. This makes it easier to keep the spare string out of the way as you tune.
- Turn the peg anticlockwise, either by hand or using the string winder, ensuring the string that is winding on is travelling further down the post. This makes the string less likely to slip as you tighten it.
- When you are sure you have enough string to securely attach and wind around the post and you are sure you are tuned to the correct octave, then you can cut the strings with pliers or wire cutters. It’s useful to bend the sharp point down with pliers so you don’t catch it on yourself.
Tuning And Stretching Your New Guitar Strings

New strings will go out of tune as they stretch. To minimise this, stretch the strings, one at a time: Pull the string a couple of inches away from the body of the guitar near the twelfth fret. Retune after stretching and expect to retune frequently at first.
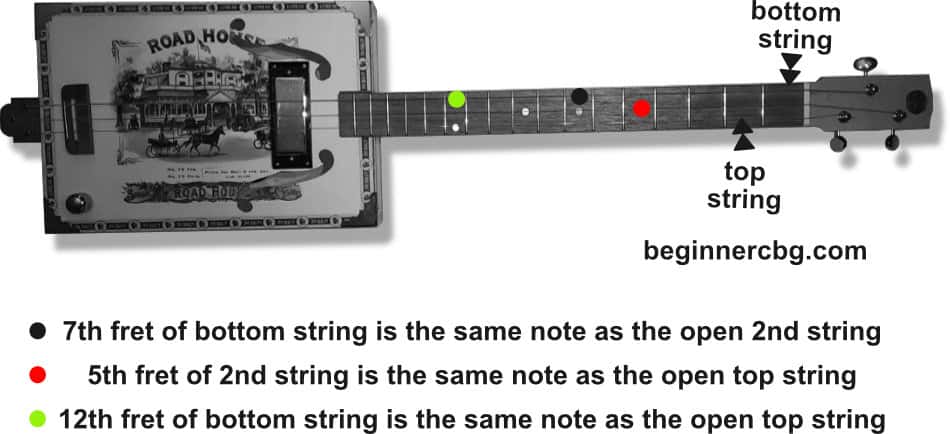
A Quick Reminder Of How To Tune Your Cigar Box Guitar To Open G
- Tune the bottom, thickest string to G
- Fret the bottom string at the 7th fret and tune the open middle string until they are the same note.
- Then, fret the middle string at the 5th fret and tune the open top string until they are the same note.
- As a final check, fret the bottom string at the 12th fret and compare it to the open top string. They should be the same note.
When You Have Installed Your first Set Of Strings
Congratulations. You have learned to do the most important part of maintenance for your cigar box guitar. Remember to change strings whenever they start to sound dead or feel rough.
Further Reading
Choosing strings for my cigar box guitar A section in this article on the difference between acoustic guitars and cigar box guitars has a bit more detail on the sounds that different kinds of strings produce.