In this lesson I will give you some very simple ideas to add a little bit of fretting finger movement to improve the sound of your 12-bar blues:
- add a finger on the middle string on the 2nd fret
- add a couple of extra notes on the top string
- add a couple of extra notes on the bass string
- add finger slides between notes
- putting it all together
- experimenting to create your own sounds
This is a lesson that many will find easier to follow if they read through this lesson, download the lesson notes and then watch a video. I have a YouTube video for this lesson coming very soon.
The Most Basic 12-Bar Blues On Cigar Box Guitar
When you first start playing Cigar Box Guitar, it’s a good idea to learn how to play a simple 12-bar blues, but you will then want to add a bit of interest by adding “twiddly bits”.
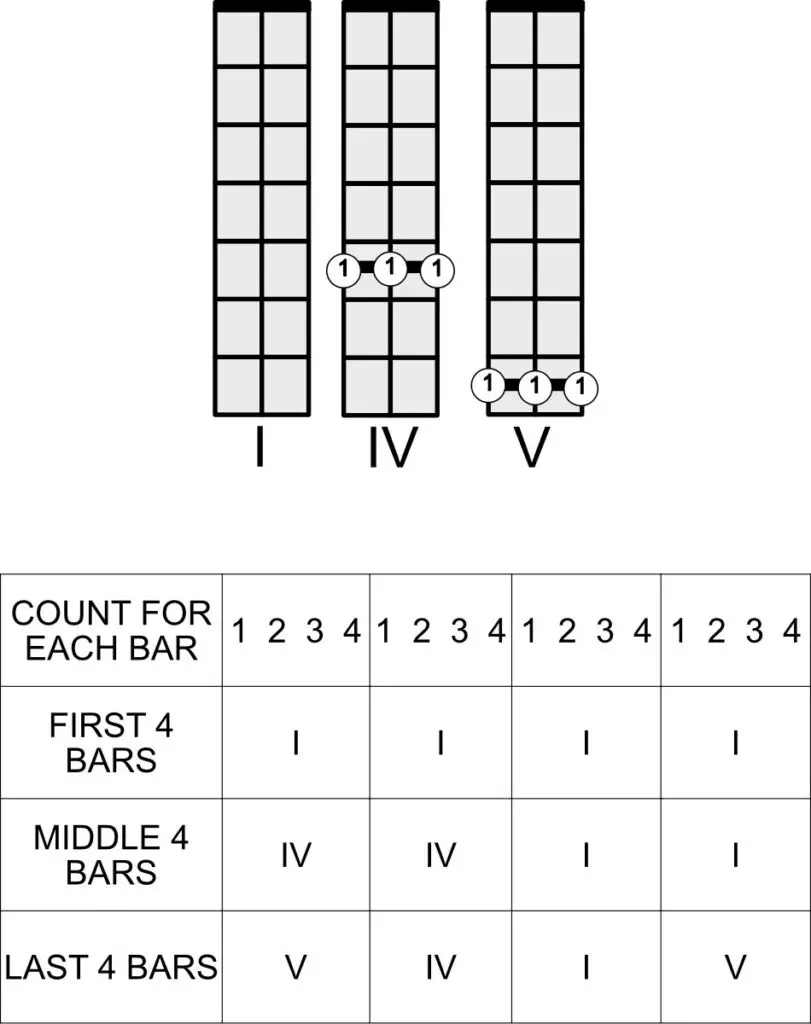
However, before we look at adding anything, make sure that you are absolutely confident with playing this pattern:

If you don’t know ( or have forgotten) I is the one chord, IV is the four chord and V is the five chord
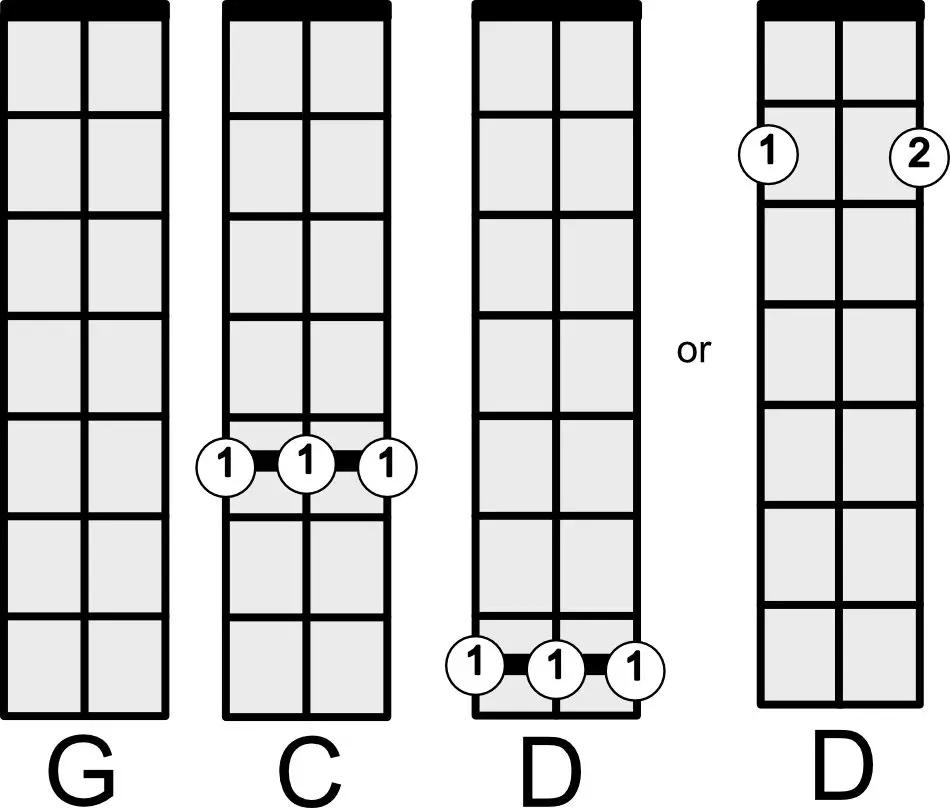
If you are tuned to open G, the chords you will be using are:

In this case. G is the I chord, C is the IV chord and D is the V chord
If you are not confident with the information above or would like some more information, including tips on strumming, I would suggest you look at this lesson Step By Step Easy Blues Chord Progressions: Number 1 and then come back to this page.
I know you might be frustrated that you are not progressing as quickly as you’d like, but it’s really worth getting the basics in place.
Add A Finger On The Middle String To Add Interest To The 12-bar Blues
This technique is easiest to practice on the open G chord to start with.
- Strum down and up on the open G chord- we are playing with a swing beat so the down beat is a bit longer than the up beat. The PDF at the bottom of this page and the YouTube Video will help you with this.
- Place your middle or ring finger* on the 2nd fret of the middle string and strum down and up
- Lift your finger and strum down and up again on the open G chord
- Place your finger down again on the 2nd fret of the middle string and strum down and up
- Repeat these 2 chords( which are G power and G6 if you find it helpful to know)
*Some people may prefer to use the pinky or little finger rather than the middle or ring finger and this is absolutely fine. Whatever feels best for you is the best fingering to use.
When you are confident with the G power chord to G 6 transition, try it on the 5th fret on the C power chord.
- Barre across the 5th fret and strum down and up
- Place a fretting finger on the 7th fret of the middle string and strum up and down
- Lift that finger and strum down and up on the C power chord.
- Repeat the process
When you are confident with this, try it on the D power chord on the 7th fret, adding the finger to the 9th fret of the middle string.
The fret markers will help you to find the correct frets, especially if you have them marked at the 5th, 7th and 9th frets. So if you forget what you are doing look for the dots.
Add These Notes On The Top String To Add Some Interest To Cigar Box Guitar 12-Bar Blues
Again, it’s best to start on the open G power chord:
- Strum down and up on the open G chord, 4 times in a row with a swing beat. Later I will show you how to combine this with the first method, but let’s keep it simple for now.
- Fret the top string( that is the highest sounding string which is nearest the floor) at the 3rd fret, followed by the 2nd fret, followed by the open string. The strumming pattern for this is :
| count | 1 | & | 2 | & | 3 | & | 4 | & | 1 | & | 2 | 3 | 4 |
| T A B | 0 0 0 | 0 0 0 | 0 0 0 | 0 0 0 | 0 0 0 | 0 0 0 | 0 0 0 | 0 0 0 | 3 0 0 | 2 0 0 | rest | 0 0 0 | rest |
| strum | D | U | D | U | D | U | D | U | D | U | no strum | U | no strum |
I will include the TAB download at the bottom of this page but I think that this way of showing you how to play it might be easier to read.
When you are confident with adding these notes onto the G power chord, try it with the C and D power chords:
| C Power chord | first note to add | second note to add |
| 5 5 5 | 8 5 5 | 7 5 5 |
| D Power chord | first note to add | second note to add |
| 7 7 7 | 10 7 7 | 9 7 7 |
Combine These 2 Fingering Patterns To Add Extra Variety To A Basic 12-Bar Blues
In the above paragraphs I have explained how to add a finger or 2 to the frets above a barred chord and now let’s look at putting them together.
| count | 1 | & | 2 | & | 3 | & | 4 | & | 1 | & | 2 | 3 | 4 |
| T A B | 0 0 0 | 0 0 0 | 0 2 0 | 0 2 0 | 0 0 0 | 0 0 0 | 0 2 0 | 0 2 0 | 3 0 0 | 2 0 0 | rest | 0 0 0 | rest |
| strum | D | U | D | U | D | U | D | U | D | U | no strum | U | no strum |
This combines the first 2 variations. Make sure you are confident with playing this pattern on the G chord and then move onto the C and D chords.
| count | 1 | & | 2 | & | 3 | & | 4 | & | 1 | & | 2 | 3 | 4 |
| T A B | 5 5 5 | 5 5 5 | 5 7 5 | 5 7 5 | 5 5 5 | 5 5 5 | 5 7 5 | 5 7 5 | 8 5 5 | 7 5 5 | rest | 5 5 5 | rest |
| strum | D | U | D | U | D | U | D | U | D | U | no strum | U | no strum |
Try Adding A Bass Line To The 12-Bar Blues For Variety
Since the bottom or bass string is a G note, just like the top string is, you can mirror what you have learned above and play it on the bass string:
| count | 1 | & | 2 | & | 3 | & | 4 | & | 1 | & | 2 | 3 | 4 |
| T A B | 0 0 0 | 0 0 0 | 0 2 0 | 0 2 0 | 0 0 0 | 0 0 0 | 0 2 0 | 0 2 0 | 0 0 3 | 0 0 2 | rest | 0 0 0 | rest |
| strum | D | U | D | U | D | U | D | U | D | U | no strum | U | no strum |
Again, add these patterns to the C and D chords
Using Finger Slides In The 12-Bar Blues
If you are not familiar with playing finger slides, I have a lesson here on hammer-ons, bends and slides:
How To Hammer-On With A Cigar Box Guitar
Rather than playing with a ceramic or glass or metal slide, what I mean here is to slide your fretting finger up or down the fretboard to change the note without plucking or strumming the string in between. This is shown in music like this:

For this version of the 12-bar blues, I like to slide down between the D and C chord as I’m are descending from the V or 5 chord to the IV or four chord, but they are not technically slides as I tend to strum between them.
You can also try adding slides between the descending notes on the top or bass string but this is definitely a bit trickier.
Experimenting With What You Have Learned To Create Your Own Version Of The Blues
Now is a good opportunity to try these small adjustments and similar to create your own riffs. I suggest that the 2nd and 3rd frets above the notes for the power chord are a good place to start but you can do whatever sounds good to you.
The PDF download below is something to get you started:
