With only 3 strings it might seem that you can’t play traditional arpeggios or broken chords, but here is a simple way to play Major and minor arpeggios:
Use the little finger on the top string to add in a note and then take it away to get some of the well-known arpeggio patterns that use 4 different notes. You can even use picking patterns involving the top and bottom note at once. Major and minor arpeggios can both be played. I will give you 7 picking patterns for using and adapting.
There is a PDF download of the patterns at the bottom of the page and a YouTube video lesson.
Read These Tips For Smooth Arpeggio Playing On Your Cigar Box Guitar
- Arpeggios are played to a very even rhythm, so you might find a metronome helps you to keep the notes in a steady rhythm.
- Start very slowly at first, making sure you know where your fingers need to be at the start and where they need to move to.
- In the examples I have given, this means knowing the 1-finger power chord and the Major or minor chord using the added little finger.
- Make the 1- finger barre chord ( open strings only for G)
- Hold your little finger above the fret to be played so that it is ready to drop down onto the strings.
- Play the pattern, dropping and raising the little finger as required.
- This technique will help you to keep the music fluid and steady without breaking the rhythm.
If you need help with chords, see these posts:
How To Play A Cigar Box Guitar With One Finger
Easy-Chords-For-Cigar-Box-Guitar-Absolute-Beginner-Part-1
How-Do-I-Play-Minor-Chords-On-The-Cigar-Box-Guitar?
How-Do-I-Play-Major-Chords-On-The-Cigar-Box-Guitar?
Which Fingers To Use For Picking?
- As far as fingering for the picking hand, I like to use my thumb on the bass string.
- Then my forefinger on the middle string.
- My second finger on the top string
- My third finger on the top string when it is fretted at the higher note.
- This probably stems from my classical guitar training and whilst it’s helpful for me, you should feel free to experiment with different fingerings until you find what suits you.
Let’s look at the first 2 fingerpicking patterns:
Picking Patterns For Major Arpeggios
The patterns above are just guidelines to help you decide how to play the arpeggios. They are not really designed to be played straight after each other as shown, although this would be a good finger exercise to play as a warm-up.
I have written all the exercises in 6/8 timing for ease of reading but you can use a different time signature. See the bottom of the page for hints on how to adapt the patterns.
The exercises are written out to help you see how you can play different styles of fingerpicking chords.
You will find them especially useful accompaniments for country and folk songs.
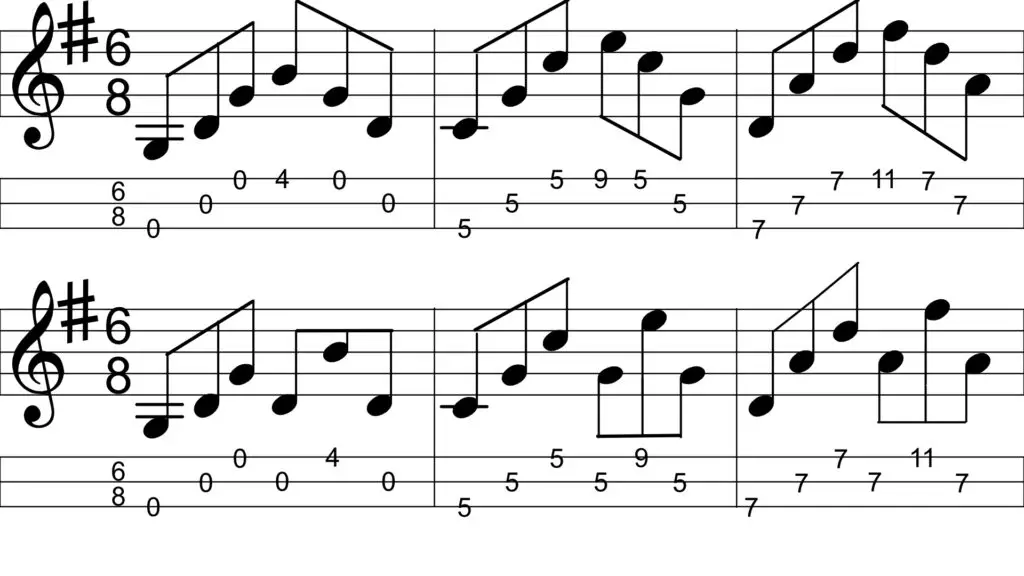
Picking Pattern 1
In the first example above, the first bar is based on G chords.
- Adding the little finger to the 4th fret of the top string changes G power chord into G Major.
- Play the 3 open strings from bass to top.
- Then fret the top string at the 4th fret for the triplet that is coming down the scale.
- You can use any finger for this note.
The 2nd bar is based on C chords.
- Fret across all 3 strings at the 5th fret using a 1-finger barre.
- Play them from bass to top.
- Then fret the top string with your little finger.
- You need to use this finger to stretch up to the 9th fret without letting go of the barre.
- Remove this finger to come back down the arpeggio, playing the 5th fret on the top 2 strings.
The 3rd bar is based on D chords.
- Fret across all 3 strings at the 7th fret using a 1-finger barre.
- Play them from bass to top.
- Then fret the top string at the 9th fret with your little finger.
- Remove this finger to come back down the arpeggio, playing the 7th fret on the top 2 strings.
Picking Pattern 2
Again, the first bar is based on G chords.
- The first 3 notes of this pattern are the same as pattern 1.
- The middle string is played for the 1st beat of the 2nd triplet.
- Again, you need to fret the 4th fret of the top string for the top of the arpeggio.
- This time though, you can leave your finger on the top string
- This is because the middle string is repeated again
The 2nd and 3rd bars are based on C and D chords respectively.
This 2nd pattern allows the top string to be fretted as soon as the top string has been played once and the little finger can stay in position for the rest of the bar.
This means that you may find version 2 slightly easier to play.
Minor Arpeggios On A 3-String Guitar
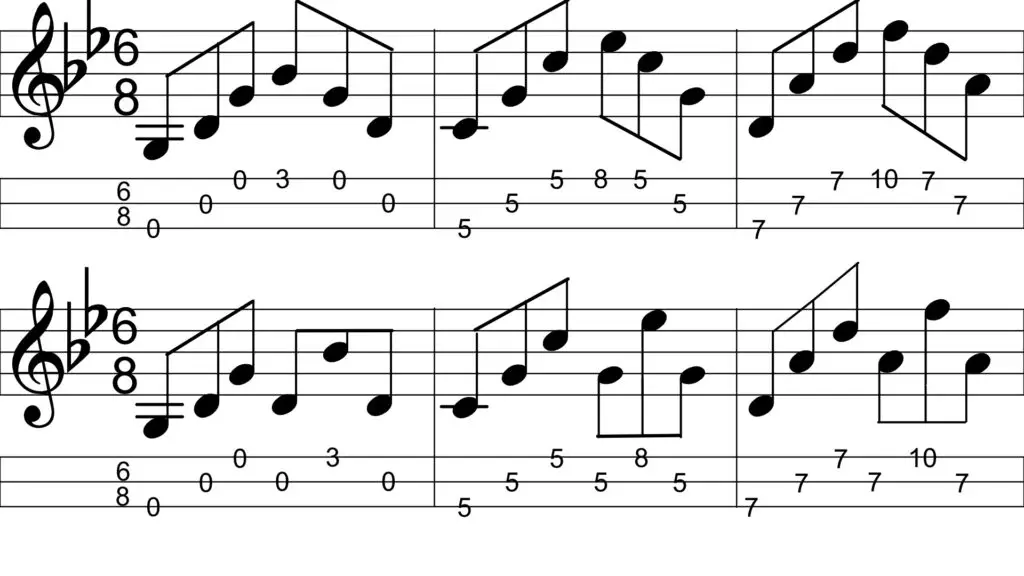
Picking Pattern 3
In the first bar of the first example, the little finger is now placed on the 3rd fret. This is because G Major can be played 0 0 3.
This is a slightly smaller stretch than the Major chord examples so you might find it a little easier to play. You might even be able to use your 3rd finger as you play the C and D minor chords. Being slightly further up the fretboard, the gaps between the frets are slightly smaller.
Picking Pattern 4
This might be the easiest of the patterns to play, especially if you have built up some coordination when practicing the first 3.
Picking Patterns That Uses The Top And Bottom Strings Played Together
When you are confident with the above exercises, you can start looking at some more complicated patterns. These next two requires 2 strings to be played at the same time.
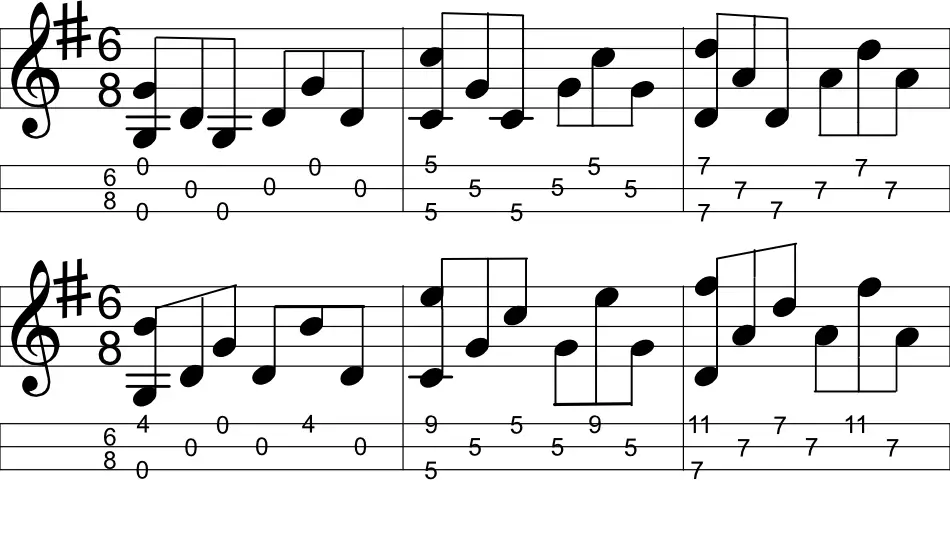
Picking Pattern 5
- Use your thumb and second finger to pluck the top and bottom strings at the same time on this pattern.
- I’ve kept this one simple without the need for using the little finger to fret.
- Keep the rhythm steady and try not to overemphasize the first beat of each bar.
- Since you are playing 2 notes at once it will naturally be louder.
- Using the thumb and finger in opposition in this way is a really useful skill so this is another good warm-up exercise.
- Try not to make the strings “twang” as you pull them together. If they do, you are plucking too hard.
Picking Pattern 6
This is the last pattern in this lesson. It’s a chance to put together all you have learned so far and is the most difficult pattern.
- Fretting with the little finger
- Raising and lowering this finger.
- Plucking 2 strings together.
- Keeping a steady beat.
When To Use These Picking Patterns
Once you are confident with these patterns it’s time to add them to a song. Find something you enjoy playing with just 3 chords. If it’s In G that means you can use the exact fingering I have given above, but don’t be afraid to try using these on any 1-finger barre chords with the added note of a major or minor chord.
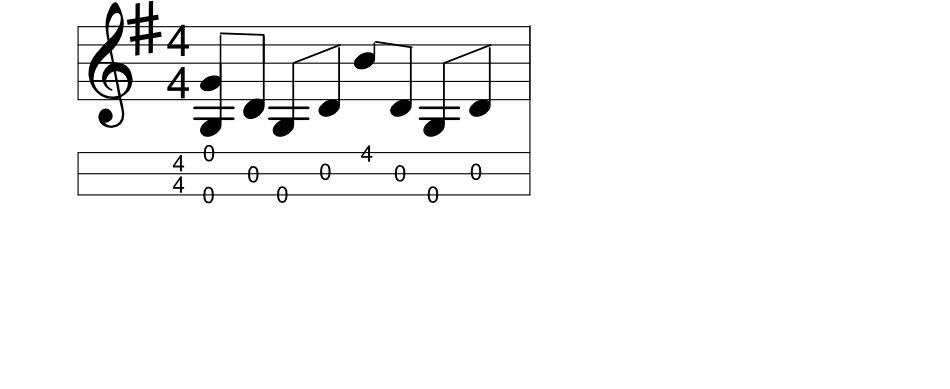
You can use them in different time signatures. The same fingerings translate well to tunes in 3/4- just accent every other note instead of every 3rd. For songs in 2/4 or 4/4 experiment with your own picking patterns. Here is an example for you to try:
PDF Download
Here is a free PDF for you and don’t forget to check out my YouTube video below: